Best Vacuum for Bed Bugs: How to Vacuum Away an Infestation Safely
Vacuuming is a key step in bed bug treatment. Learn which vacuums work best, how to use them safely, and what to do after to prevent spreading the infestation.

Table of Contents
- Best Vacuum for Bed Bugs: How to Vacuum Away an Infestation Safely
- Does Vacuuming Actually Work for Bed Bugs?
- What Features Matter in a Bed Bug Vacuum
- Why Bagged Vacuums Are the Right Choice
- How to Vacuum for Bed Bugs: Room-by-Room Technique
- What to Do AFTER Vacuuming
- Top Picks: Best Vacuums for Bed Bugs
- Frequently Asked Questions
- Final Thoughts
Best Vacuum for Bed Bugs: How to Vacuum Away an Infestation Safely
Discovering bed bugs is alarming, and the instinct to vacuum everything immediately is a good one — but only if you do it correctly with the right equipment. Vacuuming is one of the most effective mechanical removal methods available, capable of eliminating 70–80% of bed bugs and eggs when done systematically. The problem is that poor technique or the wrong vacuum can actively spread an infestation to parts of your home that were previously unaffected.
This guide covers which vacuum features genuinely matter for bed bug removal, why bagged vacuums are strongly preferred over bagless models, how to vacuum methodically for the best results, and which specific machines are worth buying for this task.
Does Vacuuming Actually Work for Bed Bugs?
Yes — with important caveats. Vacuuming is a proven, widely recommended component of integrated bed bug treatment. Research and pest control professionals consistently point to it as the most effective non-chemical method for physically removing bed bugs, nymphs, and eggs from surfaces. When done thoroughly and repeatedly, vacuuming can remove the majority of a bed bug population from a targeted area.
The critical limitation is that vacuuming alone is almost never sufficient to eliminate an infestation completely. Bed bugs hide in cracks as thin as a credit card, inside electrical outlets, behind wall trim, and deep inside mattress seams. A vacuum can reach many of these areas, but it cannot guarantee 100% removal. Vacuuming is best understood as a high-impact first step that reduces the population dramatically and makes subsequent chemical or heat treatments significantly more effective.
Important disclaimer: If you are dealing with a confirmed bed bug infestation, professional pest control treatment is strongly recommended. Vacuuming is a meaningful part of the process, but it is a component of a broader treatment strategy — not a standalone solution.
What Features Matter in a Bed Bug Vacuum
Not every vacuum is appropriate for bed bug removal. The wrong machine can make the situation worse. Here is what to look for.
True HEPA Filtration in a Sealed System
This is non-negotiable. Bed bug feces, cast skins, eggs, and body fragments are fine particles that can be expelled back into the room air if your vacuum’s filtration is inadequate. A True HEPA filter captures 99.97% of particles at 0.3 microns — sufficient to trap these contaminants. But the filter alone is not enough. The vacuum housing must be fully sealed so that air cannot bypass the filter through gaps or unsealed joints.
Look for vacuums labeled as “sealed HEPA system” or “whole-machine HEPA filtration.” An unsealed vacuum with a HEPA filter is still better than no HEPA filter at all, but a sealed system is the gold standard for this application.
Bagged Design — Strongly Preferred Over Bagless
The single most important practical consideration for bed bug vacuuming is whether the vacuum uses a bag. This is not a minor preference — it has direct consequences for whether you spread the infestation.
Here is the problem with bagless vacuums: every time you empty the dustbin, you release a small cloud of particulate matter into the air, and that particulate matter may contain live bed bugs, viable eggs, or larvae. Bed bug eggs can survive for months in a dustbin. If you empty a bagless vacuum indoors after vacuuming your mattress, you risk reintroducing bed bugs to the room, spreading them to the trash can area, or carrying them to another part of the house.
With a bagged vacuum, you never have to touch the contents at all. When you are done vacuuming, you remove the bag, seal it tightly in a plastic bag, and take it directly outside to the trash. The bed bugs stay inside. The bag itself acts as a containment device throughout the entire vacuuming session.
Bagless vacuums can be used for bed bug removal if that is what you have — but you must empty the dustbin outside, immediately after each use, into a sealed plastic bag. It introduces a risk that bagged vacuums eliminate entirely.
Strong Suction with a Flexible Hose and Attachments
Bed bugs concentrate in seams, crevices, and narrow gaps — not open floor surfaces. A vacuum that performs well on carpet but lacks a flexible hose and crevice tool is poorly suited for bed bug work. You need to be able to run a narrow attachment along mattress seams, down the sides of a box spring, into the joints of a bed frame, and along baseboards without straining.
Look for vacuums that include a crevice tool, an upholstery brush, and a flexible hose long enough to reach all sides of a bed without moving the vacuum body constantly. Strong suction is essential — bed bugs and their eggs are not loose dust, and you need real pulling power to dislodge them from fabric and crevice surfaces.
Why Bagged Vacuums Are the Right Choice
It is worth expanding on the bagged vs. bagless question because it is the decision with the most practical impact for bed bug treatment.
Pest control professionals consistently recommend bagged vacuums for bed bug removal, and the reasoning is straightforward. Bed bug eggs are particularly concerning because they are sticky — they adhere to surfaces inside a bagless dustbin and resist being dislodged during normal cleaning. Adult bed bugs can survive inside a bagless dustbin for weeks. If the bin is not emptied outside immediately after every vacuuming session — and if it is not cleaned and disinfected thoroughly afterward — it becomes a live reservoir of bed bugs inside your home.
The bag solves all of this. The vacuum operator never contacts the contents, disposal is clean and immediate, and there is no dustbin to disinfect between sessions. For an infestation that may require repeated vacuuming sessions over days or weeks, this represents a meaningful reduction in risk at every step.
If you are purchasing a vacuum specifically because you are dealing with bed bugs, buy a bagged model. The ongoing cost of replacement bags is trivial compared to the risk of spreading the infestation.
How to Vacuum for Bed Bugs: Room-by-Room Technique
Effective bed bug vacuuming is slow, systematic work. Move through each area methodically, applying firm pressure with the crevice tool and making multiple passes over high-risk zones.
Step 1: Prepare the Room
Strip all bedding, pillowcases, and mattress covers. Place them directly into sealed plastic bags for laundering at high heat — do not carry loose bedding through the house. Move nightstands and other furniture away from the walls to expose baseboards.
Step 2: Vacuum the Mattress
Start at the top surface and work down systematically. Pay particular attention to:
- Mattress seams and piping — run the crevice tool slowly along every seam, applying pressure
- Tufts and buttons — bed bugs congregate around mattress buttons and in tufted depressions
- Handles and labels — check under handles and around any sewn-on tags
- Bottom surface and edges — flip the mattress and vacuum the underside, including all four edges
Step 3: Box Spring and Bed Frame
The box spring is often the most heavily infested component of a bed. If possible, stand it on its side to access the underside fabric. Run the crevice tool along all stapled edges, corners, and any gaps in the wooden frame underneath. Vacuum all joints and corners of the bed frame itself — metal bed frames have hollow tubes and connector points where bed bugs hide in numbers.
Step 4: Nightstands, Dressers, and Upholstered Furniture
Vacuum all surfaces of nightstands, paying special attention to joints, drawer slides, and the back side facing the wall. For upholstered furniture — sofas, chairs, headboards — run the crevice tool along all seams, under cushions, and along the frame where fabric meets wood.
Step 5: Baseboards and Floor Perimeter
Run the crevice tool slowly along the entire baseboard perimeter of the room, pressing the tool firmly into the gap where baseboard meets floor. Make two passes: one pressing toward the floor, one pressing toward the wall. Bed bugs frequently travel along baseboards and hide in this gap.
Step 6: Outlet Covers and Switchplates
Bed bugs move through walls via electrical outlets. Remove outlet covers and switch plates in affected rooms and vacuum inside the opening carefully. Replace the covers afterward.
Step 7: Carpet Edges
Where carpet meets the baseboard or tack strip, bed bugs can hide in the gap. Use the crevice tool to run along all carpet edges around the perimeter of the room.
What to Do AFTER Vacuuming
Post-vacuuming procedure is as important as the vacuuming itself. Done incorrectly, disposal can undo everything you accomplished.
Immediately seal and remove the bag or contents. Do not set the vacuum down and walk away. The moment you are done, remove the bag (or empty the dustbin for bagless users) into a sealed plastic bag. Tie it closed, place it inside a second bag, and take it directly outside to an outdoor trash bin. Never leave a bag or sealed dustbin contents inside the home.
Disinfect the attachments. The crevice tool, upholstery brush, and any other attachments that contacted infested surfaces can carry live bed bugs or eggs. Wipe all attachments thoroughly with a cloth dampened with rubbing alcohol or disinfectant spray. Allow to air dry before storage. Better yet, store them in a sealed plastic bag between uses during treatment.
Check the hose. Inspect the inside of the vacuum hose for any visible insects. Wipe the interior of the hose with a long brush dampened with rubbing alcohol if you have any concern that bed bugs entered the hose body.
Repeat. A single vacuuming session is not enough. Plan to vacuum every two to three days during active treatment, and continue for at least two weeks after you believe the infestation has been resolved.
Top Picks: Best Vacuums for Bed Bugs
Best Overall (Bagged + HEPA): Kenmore Elite 21814 CrossOver Canister
Rating: 4.0 stars | Bagged HEPA canister
The Kenmore Elite 21814 CrossOver Canister is the top recommendation for bed bug treatment because it combines the two most important features — a bagged design and HEPA filtration — in a powerful canister configuration that excels at detailed cleaning work. The bagged design means disposal is clean and safe: remove the bag, seal it, discard it outside. No direct contact with bed bug-contaminated material.
The canister form factor gives you a long, flexible hose and excellent maneuverability around beds, furniture, and tight corners. The powerful motor provides the suction needed to pull bed bugs and eggs from fabric seams and crevice surfaces. Replacement bags are inexpensive and widely available — an important consideration when you are going through bags frequently during active treatment.
Best for: Anyone dealing with an active infestation who wants the safest disposal process and strong all-around performance.

Kenmore Elite 21814 bagged HEPA canister with Pet PowerMate lifts pet hair on all floors. Dual-motor power, LED dirt sensor. Read our full review.
Best Upright (Sealed HEPA): Shark Navigator NV360
Rating: 4.4 stars | 52,000+ reviews
The Shark Navigator NV360 earns strong marks for bed bug work thanks to its sealed HEPA filtration system and Lift-Away versatility. The sealed system is a genuine differentiator — it prevents fine particles, including bed bug material, from bypassing the HEPA filter through housing gaps. The Lift-Away feature detaches the canister pod from the floor unit, giving you portable suction for mattresses, upholstery, and hard-to-reach areas without dragging the full machine.
As a bagless vacuum, the NV360 requires careful emptying after each bed bug session — always outdoors, always into a sealed plastic bag. But the sealed HEPA system mitigates the risks of bagless use more than most competitors in this price range. With over 52,000 reviews backing its reliability, it is a proven machine for households that want HEPA performance at an accessible price.
Best for: Households that already own the NV360 or prefer uprights, users who are diligent about outdoor dustbin disposal.
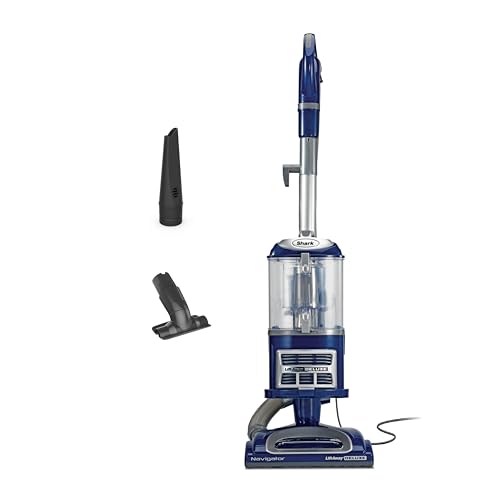
Shark Navigator Lift-Away NV360 delivers powerful suction with HEPA filtration and swivel steering. Perfect for pet hair and allergens. See full expert review.
Best Budget Option (HEPA Canister): Eureka NEN186BL
Rating: 4.2 stars | HEPA canister
The Eureka NEN186BL Bagless Canister Vacuum is the most affordable option on this list that still offers HEPA filtration in a canister configuration. Canisters have a natural advantage for bed bug work because the long hose and lightweight cleaning head let you work around, under, and over furniture without awkward maneuvering. The HEPA filter captures the fine particulate matter associated with bed bug infestations.
As a bagless model, careful outdoor disposal is required after each use. The lower price point makes it an accessible option for renters or those treating a rental property, and the canister design makes it genuinely useful for detailed seam and crevice work. Clean the filter frequently during active treatment — it will load faster than under normal household use.
Best for: Budget-conscious buyers, renters, anyone who needs a capable HEPA canister without the premium price tag.

Eureka NEN186BL bagless canister vacuum with 1000W motor, 16KPa suction, washable HEPA filter, and 2L dustbin. Lightweight and ideal for carpets and floors.
Best for Spot Treatments: BLACK+DECKER Dustbuster CHV1410L
Rating: 4.3 stars | 109,000+ reviews
The BLACK+DECKER Dustbuster CHV1410L is not a whole-room bed bug solution, but it is the right tool for targeted spot work that a full-size vacuum cannot reach conveniently. Think narrow gaps behind headboards, the underside of bed slats, inside small furniture joints, and outlet vacuuming where a full hose is unwieldy.
With over 109,000 reviews and a 4.3-star rating, it is one of the most proven handheld vacuums available. Use it as a supplementary tool alongside a full-size vacuum — not as a replacement. After each use on infested surfaces, empty the dustbin outdoors into a sealed bag and wipe down the unit and attachments with rubbing alcohol.
Best for: Supplementary spot treatment, tight spaces, quick targeted sessions between full vacuuming runs.
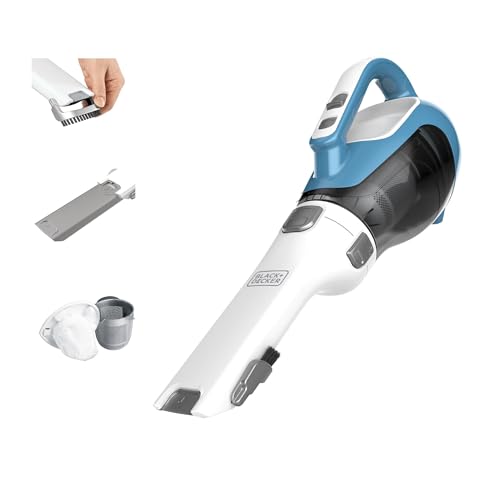
BLACK+DECKER Dustbuster AdvancedClean cordless handheld vacuum with cyclonic suction and 16V battery. Great for home and car. Read our expert review now.
Frequently Asked Questions
Can vacuuming alone eliminate a bed bug infestation?
No. Vacuuming can remove 70–80% of bed bugs and eggs when done thoroughly and repeatedly, but it cannot eliminate an infestation on its own. Bed bugs hide in locations a vacuum cannot reach — inside wall voids, behind electrical outlets, deep in furniture joints, and in cracks in wood or plaster. Vacuuming should be combined with heat treatment, encasements, and in most cases professional chemical treatment for complete eradication.
Do bed bugs survive inside a vacuum?
Yes — both in the dustbin and potentially inside the hose. Adult bed bugs can survive for weeks without feeding, and eggs can survive for months in the right conditions. This is why immediate disposal of the bag or dustbin contents after every session is essential, and why attachments must be wiped down with rubbing alcohol after use. Never store a vacuum used on an infested area inside your home without thoroughly cleaning it first.
How often should I vacuum during bed bug treatment?
During active treatment, vacuum every two to three days. This frequency helps capture newly hatched nymphs before they mature and reproduce. Continue vacuuming at this pace for at least two weeks after you believe the infestation has cleared, as bed bug eggs can take 6–10 days to hatch and may not have been present as adults during earlier sessions.
Should I use a steam cleaner alongside vacuuming?
Yes — steam is an excellent complement to vacuuming for bed bug treatment. Steam at 160–180°F kills bed bugs and eggs on contact, including in fabric seams and crevices where a vacuum may not dislodge eggs. Vacuum first to remove live insects and loose debris, then apply steam to seams, tufts, and crevice areas. Allow surfaces to dry fully before encasing or replacing bedding.
Is a shop vac a good choice for bed bugs?
A shop vac can work if it is equipped with a HEPA cartridge filter — standard shop vac filters are too porous to trap the fine particles associated with bed bug infestations. The main disadvantage is that shop vacs are generally designed for larger debris and may not produce the concentrated suction at a crevice tool tip that a proper upright or canister delivers. A purpose-built HEPA canister or upright with a crevice attachment will outperform an unmodified shop vac for this specific task.
What should I vacuum if I am not sure where the bed bugs are?
Start with the bed — mattress seams, box spring, and bed frame joints — because that is where bed bugs concentrate in the vast majority of infestations. Then work outward: upholstered furniture within 15 feet of the bed, baseboards along all walls of the bedroom, and any upholstered chairs or sofas where occupants spend extended time. Bed bugs follow heat and carbon dioxide, so they nest within feeding distance of sleeping and resting areas.
Final Thoughts
Vacuuming is one of the most powerful tools available for mechanical bed bug removal — but only when you use the right machine with the right technique, and follow through with proper disposal. The Kenmore Elite 21814 CrossOver Canister is the top recommendation because it combines bagged design with HEPA filtration, giving you the safest possible containment and disposal process throughout treatment. For those who prefer an upright, the Shark Navigator NV360 provides a sealed HEPA system that significantly reduces the risk of spreading contaminants during vacuuming.
Whatever vacuum you choose, remember that it is one part of a broader strategy. Vacuuming reduces the population and improves conditions for other treatments. It does not end an infestation alone. Work with a licensed pest control professional, combine vacuuming with encasements and heat treatment, and be consistent. Bed bug treatment is a sustained effort — the right vacuum just makes that effort meaningfully more effective.
Kenmore Elite 21814 bagged HEPA canister with Pet PowerMate lifts pet hair on all floors. Dual-motor power, LED dirt sensor. Read our full review.
Ready to Find Your Perfect Vacuum?
Browse our expertly reviewed vacuum cleaners and make an informed decision
Browse All Vacuums