Complete Vacuum Maintenance Guide: Make Your Vacuum Last 10+ Years
A well-maintained vacuum lasts twice as long and cleans twice as well. Our complete vacuum maintenance guide covers filters, brush rolls, belts, bins, and more.

Table of Contents
- Complete Vacuum Maintenance Guide: Make Your Vacuum Last 10+ Years
- Why Vacuum Maintenance Matters
- Complete Vacuum Maintenance Schedule
- Proper Storage
- Maintenance by Vacuum Type
- Warning Signs That Need Immediate Attention
- When to Repair vs. Replace
- Low-Maintenance Vacuum Recommendations
- Frequently Asked Questions
- Quick Reference: Complete Maintenance Checklist
Complete Vacuum Maintenance Guide: Make Your Vacuum Last 10+ Years
Most vacuums that end up in the trash still have years of life left in them. A clogged filter here, a tangled brush roll there, and suddenly the suction feels weak — so the vacuum gets tossed. The truth is that a $150 vacuum maintained properly will outperform and outlast a $400 vacuum that never sees any care.
This guide covers everything: a practical maintenance schedule, step-by-step instructions for every task, and type-specific tips for uprights, canisters, cordless stick vacs, and robot vacuums. Follow it and your vacuum will still be running strong a decade from now.
Why Vacuum Maintenance Matters
A vacuum loses suction in one of three ways: the bin is full, the filter is clogged, or there is a blockage somewhere in the airflow path. Every single one of those causes is preventable with routine maintenance.
Beyond suction loss, neglected vacuums develop other problems — brush rolls that stop spinning, belts that snap, motors that overheat. Replacing a belt costs about $5. Replacing a vacuum costs $100 to $500. The math is obvious.
There is also an indoor air quality angle. A dirty filter does not just reduce suction — it blows captured dust and allergens back into the air you breathe. Regular maintenance keeps your vacuum working as a true air-cleaning tool, not just a dirt-moving machine.
Complete Vacuum Maintenance Schedule
After Every Use
1. Empty the Dustbin
The single biggest cause of suction loss is a full dustbin. Most people wait too long to empty it.
How full is too full? For bagless vacuums, empty the bin when it reaches the MAX fill line — typically about two-thirds full. Do not wait until it is overflowing. A packed bin restricts airflow through the cyclone separators and filter, causing an immediate, measurable drop in suction.
How to empty without a dust cloud:
- Take the vacuum outside or over a large trash bag.
- Hold the bin low inside the bag before pressing the release button.
- Tap the bin gently against the inside of the bag rather than shaking it vigorously.
- If the bin has a removable inner cone or cyclone mesh, rinse it monthly under warm water and let it dry completely before reassembling.
For bagged vacuums, replace the bag when it is two-thirds full. A bag that is completely stuffed loses 30–40% of its suction efficiency. Keep a stock of genuine replacement bags — off-brand bags often have thinner material that lets fine dust pass through.
Monthly Maintenance
2. Clean or Replace Foam Pre-Filters
Most vacuums have a two-stage filtration system: a foam or felt pre-filter that catches larger particles before air reaches the main HEPA filter. This pre-filter is the unsung hero of vacuum maintenance. Keeping it clean protects the HEPA filter and doubles or triples its lifespan.
Steps:
- Unplug the vacuum. Remove the pre-filter (usually located behind or below the dustbin).
- Tap it gently over a trash can to dislodge loose debris.
- If washable (most foam pre-filters are), rinse under cool water until the water runs clear. Do not use soap — it can leave residue that restricts airflow.
- Critical: Let the filter air-dry for a full 24 hours before reinstalling. A damp filter placed back in a vacuum will grow mold and can damage the motor.
3. Clear the Brush Roll of Hair and Thread
Hair wraps around the brush roll with every single use. Over time, it builds up into a tight coil that presses against the brush roll bearings, slows rotation, and can even melt the belt from friction heat.
Tools you need: Scissors or a seam ripper (a small hook-shaped sewing tool). A seam ripper is actually safer because you can slide it under the hair without risking cuts to the bristles.
Steps:
- Unplug the vacuum and lay it on its back.
- Remove the brush roll cover (usually held by two screws or a simple latch).
- Use scissors to make cuts across the wrapped hair at two or three points around the circumference of the brush roll. This breaks the hair into shorter sections.
- Pull the cut sections free with your fingers or a seam ripper.
- Check both end caps — hair collects in the bearing sockets at each end of the roll. A cotton swab or toothpick clears this well.
- Spin the brush roll by hand. It should rotate smoothly with minimal resistance. If it feels stiff, the bearings may be worn.
- Reinstall the cover and test.
Pet owners and people with long hair should do this weekly rather than monthly. A tangled brush roll is one of the fastest ways to wear out a belt prematurely.
4. Wipe Down Attachments and Exterior
Use a damp microfiber cloth to wipe the exterior of the vacuum body, hose connection points, and any attachment storage slots. Pay attention to the wheels — debris caught in the wheel axles on robot vacuums and uprights causes uneven wear and scratches on hard floors.
Every 3 Months (Quarterly)
5. Clean or Replace HEPA Filters
True HEPA filters capture 99.97% of particles down to 0.3 microns. They do this by building up a layer of captured particles that actually improves filtration — but only up to a point. After that, the dense layer restricts airflow too much.
Washable HEPA filters (check your manual — not all are washable): Rinse under cool water, squeeze gently, and rinse again until the water runs clear. Never wring or twist. Allow 24–48 hours to dry completely before reinstalling.
Non-washable HEPA filters: Replace every 6–12 months depending on usage. If you have pets or use the vacuum daily, replace every 6 months. Light users can stretch to 12 months. A replacement HEPA filter typically costs $15–$30 and is the most important maintenance purchase you can make.
Signs a HEPA filter needs replacing even if it looks clean: Reduced suction despite an empty bin, musty smell after vacuuming, increased allergy symptoms in household members.
6. Inspect the Hose for Clogs and Cracks
A partial blockage in the hose is one of the sneakiest maintenance problems because it causes suction loss that looks like a filter issue.
The broom handle test: Detach the hose from the vacuum. Drop a coin or small ball through one end — it should fall out the other end freely. If it does not, use a broom handle or straightened wire hanger to push the blockage out from the clear end. Never push a sharp object into the hose — most vacuum hoses are thin plastic and puncture easily.
Checking for cracks and leaks: Hold the hose up to a light and flex it gently along its length. Cracks are most common near the ends where the hose connects to the vacuum body and wand. A cracked hose loses suction and cannot be repaired reliably — replacement hoses cost $15–$40 and are worth it.
7. Clean Attachments Thoroughly
Crevice tools, upholstery brushes, and dusting brushes accumulate a surprising amount of grime inside their narrow channels. This is not just a hygiene issue — buildup in these tools restricts airflow and reduces their effectiveness.
For plastic attachments (crevice tools, wands): Soak in warm water with a small amount of dish soap for 10–15 minutes. Use a bottle brush or pipe cleaner to scrub the interior. Rinse thoroughly and allow to air dry before use.
For brush attachments with bristles: Remove visible hair and debris first, then soak in warm soapy water. Use an old toothbrush to scrub the bristle base where grime collects. Rinse and dry.
Do not reassemble or use attachments until they are completely dry, especially if they connect to an electric-powered brush head.
Annually
8. Check and Replace the Drive Belt
The belt connects the motor to the brush roll, transferring power to spin the bristles. Belts are made of rubber and stretch and degrade over time — typically lasting 6–18 months under normal use.
Signs a belt needs replacing:
- The brush roll spins slowly or stops when pressed against carpet
- A burning rubber smell during vacuuming (this is a stretched belt slipping)
- Reduced carpet agitation even though the brush roll appears free of hair
- Visible cracking, fraying, or looseness when you examine the belt directly
How to replace a belt:
- Unplug the vacuum and remove the brush roll cover.
- Slide the brush roll out by lifting one end from its bearing socket.
- The old belt will be looped around one end of the brush roll and around a small motor pulley. Slip it off both.
- Loop the new belt around the motor pulley first, then around the belt groove on the brush roll.
- Seat both ends of the brush roll back into the bearing sockets.
- Rotate the brush roll by hand a few times to seat the belt and check for proper tension.
- Reinstall the cover and test.
Replacement belts cost $5–$12 and take about 10 minutes to replace. Always buy manufacturer-specific belts — universal belts are often the wrong width or length.
9. Clean Robot Vacuum Sensors
For robot vacuum owners, sensor cleaning is the one maintenance task most people completely overlook. Dirty sensors cause missed areas, falling down stairs, inability to find the dock, and erratic navigation patterns.
Cliff sensors (the downward-facing sensors on the robot’s bottom edge that detect drop-offs): Wipe gently with a clean, dry microfiber cloth or cotton swab. Dust on these sensors makes the robot think there is a drop-off where there is not one, causing it to avoid perfectly flat floor areas.
Optical floor sensors and camera lenses (on top or front of the robot): Wipe with a slightly damp cloth, then dry immediately. Smudges on camera lenses degrade mapping quality significantly.
Charging dock contacts (on the robot’s underbelly and the dock itself): Clean with a dry cloth or a cotton swab dipped in isopropyl alcohol. Corroded contacts cause charging failures and are a common reason robot vacuums stop docking properly.
10. Inspect the Power Cord
Run your hand along the entire length of the power cord from the plug to the vacuum body. Feel for kinks, cuts, or soft spots where the insulation has cracked. Pay special attention to where the cord enters the vacuum — this is the highest-stress point.
A damaged cord is a fire and shock hazard. If you find damage, do not use the vacuum until the cord is replaced by a qualified repair technician or an authorized service center.
Proper Storage
How you store your vacuum matters more than most people realize.
Uprights: Store standing upright (as designed), never lying on their side. Side storage puts stress on the handle joint and can crack the casing over time. Keep in a dry indoor location — garages with humidity swings are not ideal.
Cord care: Never yank the cord from the outlet by pulling the cord itself — always grasp the plug. When wrapping the cord, use loose loops rather than tight wraps around hooks or handles. Tight bends are where cord insulation cracks first.
Cordless stick vacuums: Battery storage is the key concern. Do not store with the battery fully depleted or fully charged for extended periods — lithium-ion batteries stored at around 40–60% charge have the longest lifespan. If you are storing the vacuum for more than two weeks without use, charge to about half capacity. Store at room temperature — heat above 30°C (86°F) degrades lithium-ion cells rapidly.
Robot vacuums: Keep the dock in a stable location away from direct sunlight. Sunlight on the dock’s IR emitters confuses the robot’s homing sensors. Ensure the dock has adequate clearance on both sides (usually 18 inches / 45 cm) and in front (4 feet / 1.2 m) for reliable docking.
Maintenance by Vacuum Type
| Type | Key Focus Areas | Unique Needs |
|---|---|---|
| Upright | Belt, brush roll, pre-filter | Belt replacement is most critical |
| Canister | Hose, wand connections, bag or bin | Check hose seals at both connection points |
| Cordless Stick | Battery health, filter, brush roll | Never fully drain the battery |
| Robot Vacuum | Sensors, side brushes, bin, dock contacts | Clean sensors quarterly; replace side brushes every 6 months |
Canister vacuums rarely have belts — the motor drives the suction directly — so brush roll maintenance applies only to powered floor heads. Focus on hose condition and bag/filter changes.
Robot vacuum side brushes spin against hard floors and fray quickly. Inspect them monthly and replace them every 6–12 months ($10–$20 for a set). A bent or worn side brush reduces edge cleaning effectiveness dramatically.
Warning Signs That Need Immediate Attention
Do not ignore these symptoms — they indicate a problem that will worsen quickly and may create a safety risk.
Burning smell: Almost always a slipping or broken belt rubbing against the brush roll. Stop immediately, unplug, and inspect the belt. Running a vacuum with a burnt belt can damage the motor.
Sudden suction loss: Check the bin, then the filters, then the hose in that order. If all are clear, suspect a crack in the hose or housing that is leaking air.
High-pitched whining: Often indicates a blockage that is straining the motor, or a bearing failing in the brush roll or motor. Continued use accelerates motor damage.
Sparks or flickering power: Cord damage or a failing motor. Stop using immediately and do not plug back in until inspected by a technician.
Strong odor even after cleaning: Usually mold inside a washable filter that was reinstalled damp, or debris trapped in the hose or brush roll bearings that has started to decompose. Clean all washable parts and allow full drying time.
When to Repair vs. Replace
Repair is almost always worth it if:
- The vacuum is less than 5 years old
- The repair cost is under 40% of the replacement cost
- It is a quality brand with available parts (Shark, Dyson, Miele, Bissell)
Replacement makes more sense if:
- The motor has failed (motors typically cost $60–$120 to replace, often approaching the cost of a new vacuum)
- The vacuum is more than 8–10 years old and requires multiple simultaneous repairs
- Replacement parts are discontinued
For budget vacuums under $100, any repair that costs more than $30 is usually not economically justified.
Low-Maintenance Vacuum Recommendations
If you want a vacuum that stays cleaner between maintenance sessions and is designed for easy upkeep, these models are worth considering.
Shark Navigator NV360
4.4 stars | 52,000+ reviews
The Shark Navigator NV360 has washable foam and felt filters that cost nothing to maintain, a brush roll that is accessible without tools, and a Lift-Away pod that makes cleaning hard-to-reach areas simple without dragging the whole machine around. At this price point, it is one of the most maintenance-friendly uprights available. Brush roll hair removal is especially easy thanks to the wide access panel.
eufy Omni C20 Robot Vacuum
4.2 stars | 80,000+ reviews
The All-in-One Station on the eufy Omni C20 automatically empties the onboard dustbin after every run — one of the best low-maintenance features in robot vacuums. Instead of emptying the small bin daily, you only need to deal with the larger station bag every 30–45 days. The mopping pad auto-washing and drying feature further reduces the maintenance burden compared to standard robot mop combos.
Bissell CleanView Swivel Pet Upright
4.4 stars | 105,000+ reviews
The CleanView Swivel is designed with pet owners in mind, and pet hair is one of the biggest maintenance challenges a vacuum faces. The cyclonic filtration system reduces how quickly filters load up with fine pet dander, and the washable filters keep ongoing costs near zero. The large dustbin means fewer empties per session, and the swivel steering reduces stress on the hose and body from awkward angles.
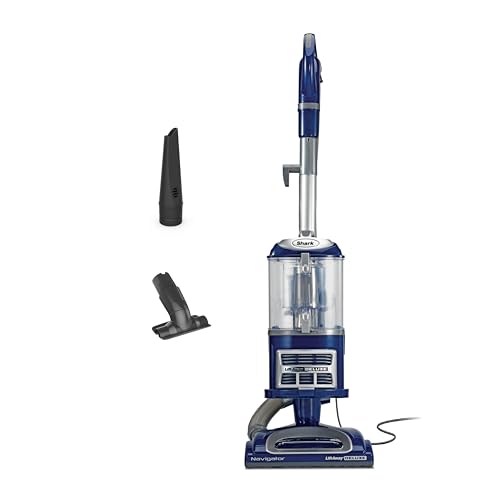
Shark Navigator Lift-Away NV360 delivers powerful suction with HEPA filtration and swivel steering. Perfect for pet hair and allergens. See full expert review.
Frequently Asked Questions
How often should I clean my vacuum filter?
Pre-filters should be cleaned monthly. HEPA filters should be replaced every 6–12 months (or cleaned if washable). If you have pets or use the vacuum more than three times per week, shorten those intervals by about half.
Can I wash all vacuum filters?
No. Many filters — including most true HEPA filters — are not designed to be washed. Washing a non-washable filter destroys the filter media and renders it ineffective. Always check your manual or look for a “washable” label on the filter itself before rinsing anything.
How do I know if my vacuum belt is broken?
Turn the vacuum on and place your hand near the brush roll. If you feel little or no airflow agitation from the bristles, or if the brush roll does not spin, the belt is likely broken or severely stretched. You can also remove the brush roll cover and visually inspect the belt — a broken belt will be visibly snapped.
Is it bad to vacuum every day?
Not for the floors — daily vacuuming is great for cleanliness, especially with pets. But daily use means maintenance intervals should be shortened. Empty the bin after every use, check the brush roll every week, and plan on replacing filters and belts more frequently than the standard schedule.
Why does my vacuum smell bad even after I empty it?
Odors typically come from one of three sources: a dirty filter (especially one installed while still damp), trapped debris in the brush roll bearing caps or hose, or a dustbin that has absorbed odors over time. Wash all washable components, ensure complete drying, and consider placing a dryer sheet in the dustbin (away from the filter) to help with odors between deep cleans.
What is the average lifespan of a vacuum?
A quality vacuum maintained properly lasts 8–12 years. Budget vacuums typically last 3–5 years even with good care. The motor is usually the first component to fail beyond repair — everything else (belts, filters, brush rolls, hoses) is replaceable at low cost.
Do robot vacuums need less maintenance than uprights?
Not less — different. Robot vacuums require more frequent sensor cleaning and side brush replacement, plus regular dock contact cleaning. The advantage is that most tasks take under five minutes. The biggest risk with robot vacuums is neglecting cliff sensors, which can cause the robot to avoid areas of the floor it incorrectly reads as dangerous.
Quick Reference: Complete Maintenance Checklist
After every use
- Empty the dustbin (before reaching the MAX line)
Monthly
- Rinse and dry foam pre-filter
- Remove hair from brush roll
- Wipe down exterior and wheels
- Clean attachments
Every 3 months
- Clean or replace HEPA filter
- Inspect hose for clogs and cracks
- Deep clean all attachments (soak)
- Clean robot vacuum sensors and dock contacts (robot owners)
- Replace robot side brushes if frayed (robot owners)
Annually
- Replace drive belt
- Inspect power cord for damage
- Check brush roll bearings
- Replace HEPA filter if not washable
Proper vacuum maintenance is not complicated, and it does not take much time. A 10-minute session once a month is enough to keep most vacuums running at peak performance indefinitely. The cost of replacement parts — filters, belts, bags — is a fraction of what a new vacuum costs. Treat your vacuum like any other appliance worth maintaining, and it will return the favor with years of reliable, powerful cleaning.
Ready to Find Your Perfect Vacuum?
Browse our expertly reviewed vacuum cleaners and make an informed decision
Browse All Vacuums